In this post I will explain how to 3D print and build an illuminated magnifying glass for a Hobby Creek Pana-Hand. The motivation for this project came when I was building my new dual extruder 3D printer (which I used to 3D print the models I will later show) and somehow managed to short out the fan pins and burn an SMD MOSFET. Fortunately for me, I’m not afraid of soldering so I decided to buy a bunch of transistors and go for the kill.
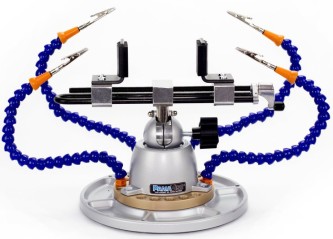
If you’re like me and you haven’t yet mutated a third hand, you will probably find it useful to have some sort of alligator clips stand to facilitate soldering or tinkering . I currently own a Hobby Creek Pana-Hand which allows me to have not only one extra hand but a gazillion of them ready to obey my every wish and command. I used this setup to get the board in place and position some solder close enough so that I wouldn’t have to hold it, but unfortunately the transistor is really small and I had to use an external illuminated magnifying glass to actually be able to see anything.
After I successfully managed to replace the transistor, my subconscious mind had already made the decision:  I was going to make an illuminated magnifying glass arm! I did some digging through my old junk cupboard and found one of these ubiquitous helping hands with a magnifying glass on it and dismantled the damn thing. The magnifying glass itself is good enough for the kind of soldering I do and it’s about 60mm in diameter which is also quite a decent size.
The final thing I needed which I didn’t already have or couldn’t 3D print was an arm to spare. Fortunately for me Hobby Creek also makes a Universal Holder Arm which looked easy to disassemble so I bought one of those and basically removed the reusable zip-tie and kept the screw.
The Design Process
I followed a pretty inefficient iterative process and ended up with a couple of useless 3D printed parts on the way, but in my defence I’m a software engineer so CAD modelling is not something I’m really experienced at. It is my hope that someone will read this some day and learn something so in this section I will go over the pretty basic electronics, the CAD model design and the selection of 3D printing materials. If you’re not interested in the process I followed to reach the final product, you can go directly to the build section.
Electronics
The electronics of this project are very simple, it is just an LED circuit with 12 LEDs in parallel and a current limiting resistor in series with the supply. As the name suggests, the current limiting resistor is used to limit the current going through the LEDs and avoid burning them. Due to the parallel arrangement, each LED has the same voltage but, in very simple terms, the current is shared amongst them. The following diagram is a simplification of the final circuit using only two LEDs:

Now the important part in this circuit is to get the current limiting resistor value right, otherwise we will either risk reducing the lifetime of our LEDs or simply not have enough brightness. The calculation is rather simple, but before we can actually calculate anything we need to find out the following:
- Voltage source (
), which in this case is going to be 5v.
- Voltage drop of the LEDs (
), in this particular case it happened to be 2.8v, but you will have to measure the one of your LEDs. An easy way to do this is to use a high enough resistor (> 1k should be more than enough) and measure the voltage between the LED terminals.
- Desired LED current (
), we can find this value experimentally by playing with the resistor value and checking if the brightness is enough for our purpose. A rule of thumb with typical 5mm LEDs is to avoid getting too close to 20mA as the LED lifetime will be decreased significantly (Don’t quote me on this). I’ve determined that with about 8mA, the LEDs are bright enough.
- Number of LEDs you’re going to use (
).
With all this information, it’s now easy enough to calculate the resistor value we need with the following formula:
 / (I \cdot n)")
If you’re too lazy to launch the calculator app on your phone or on your computer, you can always use this online calculator, and go to the parallel case. I must admit I was lazy enough to use this calculator, but in fairness it does provide you with the closest resistor to the value you can actually buy, which is pretty handy. If you weren’t satisfied with my explanation, maybe can help, but I wouldn’t know as I haven’t even looked at it.
If you’re still wondering about the result in this particular case, it’s 22.9Ω but the closest resistor I can buy is 27Ω. For the power supply I will be using a μUSB breakout board, since I always have a couple of cables lying around the table. The LEDs I will use are standard 5mm white; I also had a couple of 3mm LED, but in my experience those are very easy to damage and the degradation is much faster.

Finally a note of caution, I might be wrong on my suggestions so if you want to be 100% sure of what you’re doing, you can probably find other resources online with much more accurate information. In any case, it worked fine for me and if you break a couple of LEDs it’s not the end of the world.
3D Printable Model
Modelling the glass holder as I envisioned it was probably the most difficult part. To create all the models I used Onshape which is a pretty cool 3D CAD modelling software which works pretty well on the browser. The model itself had a couple of requirements such that it should fit the 60mm magnifying glass, the 12, 5mm LEDs and the μUSB breakout board. My original idea was to divide the model in three different parts: the light diffuser, the core and the lid. I started with a very simple prototype which was probably unnecessary and a product of impatience. This prototype only allowed me to fit the LEDs and the magnifying glass, so it was pretty useless.

The second prototype was another failed idea, but it allowed me to understand how to better design the diffuser since the small diffuser was not very effective. I also figured that connecting all of the LEDs in this approach would not be easy, as I would’ve had to squish the cables around the screws.
The third design worked pretty well on every aspect: the size was just right, the LEDs and the magnifying glass fit really well, the connection between the LEDs was relatively easy to make and the diffuser (which was completely empty) worked pretty well. Unfortunately, at this point I came to the conclusion that white PLA for the diffuser was not the best idea as, even though it diffused pretty well. I believed I could find a better material for the job, and so I did.
The material choice I went for was Clear Taulman T-Glase. T-Glase is very well known for its optical properties so it was the perfect choice for the job. As you can see on the following picture, the light diffusion is quite nice on clear T-Glase:

Unfortunately, once I made the decision, I opened a small Pandora’s box of my own. T-Glase is famous for being difficult to print with problems ranging from terrible overhangs, irregular extrusion, flimsy layer adhesion and, to make matters worse, T-Glase has very little adhesion to PLA, so the dual extrusion idea was going to be quite difficult. Fortunately, PLA, the paragon of 3D printing materials, adheres just fine to T-Glase, which solved half of my problems.

So once I got past this particular bump on the road, I went ahead and created my next and final design, which included a solid diffuser and a much more compact lid, with the arm connection on the inside. I’ve generated a couple of images from the different parts of the model for your enjoyment:

This final design can be printed on a dual or single extruder 3D printer, although if you go for the single extruder approach you will need to glue the diffuser to the core. The reason for the diffuser being completely solid is because that way I can take full advantage of the internal reflections produced on T-Glase, but if you’re going to use another type of material you might need to print the diffuser hollow. The final STL files can be downloaded here.
3D Print & Build
Bill of Materials
If you want to buy any of the materials I used for this build you can use the following links, although I must warn you that the eBay and Amazon links are “affiliate” links and they provide me with a negligible amount of money.
With all the decisions made and the models generated, it was time to get on with the 3D print and the build of the illuminated magnifying glass. The first step in the process was to 3D print the models. As mentioned before, I used blue PLA for the core and the lid, and Clear Taulman T-Glase for the diffuser. If you don’t have a dual extruder, you can print each part individually and glue the core to the diffuser with some sort of cyanoacrylate or even hot glue. The settings I used for each material were the following:
Blue PrimaValue PLA:
- 0.2mm layer height.
- 185º extruder temperature.
- 60º heated bed temperature with kapton tape.
- 50% infill
- 3 top and bottom layers.
- 100% cooling fan.
- 70mm/s speed.
- 0.4mm nozzle.
Clear Taulman T-Glase:
- 0.2mm layer height.
- 238º extruder temperature.
- 70º heated bed temperature with kapton tape.
- 50% infill
- 3 top and bottom layers.
- 100% cooling fan.
- 15-25mm/s speed.
- 0.4mm nozzle.
Since I printed both the core and the diffuser together, I also used a prime pillar which was exclusively printed with T-Glase and an ooze shield printed only with PLA. The reason for this is that the ooze shield, as the name suggests, collects the oozing from both the PLA and the T-Glase (which oozes a lot), and the prime pillar allows to get the T-Glase filament running before printing each layer of the part. I also used a brim to increase the adhesion of both the ooze shield and the prime pillar. You might be wondering why I printed with the diffuser on the bottom, given that it has some overhangs. The main reason for this is that I needed the PLA to be printed on top of the T-Glase as the other way around wouldn’t work due to the terrible adhesion when printing T-Glase on top of PLA. I used Simplify 3D to generate the G-Code and this is the resulting preview:

Even though the print worked, it was certainly not an easy print. Since Simplify3D doesn’t provide a way to generate different parts of the brim with different materials and the adhesion between T-Glase and PLA is far from perfect, the prime pillar decided to make a run for it, resulting in a mess of spaghetti T-Glase. Fortunately, this madness was contained to the last two layers containing T-Glase. If you think I’m exaggerating have a look (I cleared up some of the mess at this point, but it’s pretty descriptive):

Since T-Glase doesn’t adhere to the kapton tape as well as some sources claim, I had to ramp up the temperature to 70º, which ultimately caused the PLA to warp a bit, although I must admit it’s not too bad:

Printing the Lid was pretty much straightforward using the settings detailed before. With the printed parts ready, the next step was to add the LEDs and solder them in parallel. To do this, I stripped a cable and introduced it through each groove, finally soldering it to the anode or cathode respectively.

Once all the LEDs had been soldered together, I soldered the resistor to the μUSB breakout boar.The positive cable was then soldered to the resistor and the negative cable to the breakout board itself. I also glued the breakout board to the core with some cyanoacrylate:

The next step was to connect the arm and the lid using the original screw, at this point I must warn you that the screw I received on my Universal Holder Arm might be different to the one you’re using, so it might not be a perfect fit. The fit between the lid and the arm needs to be pretty stiff, with no rotation whatsoever:
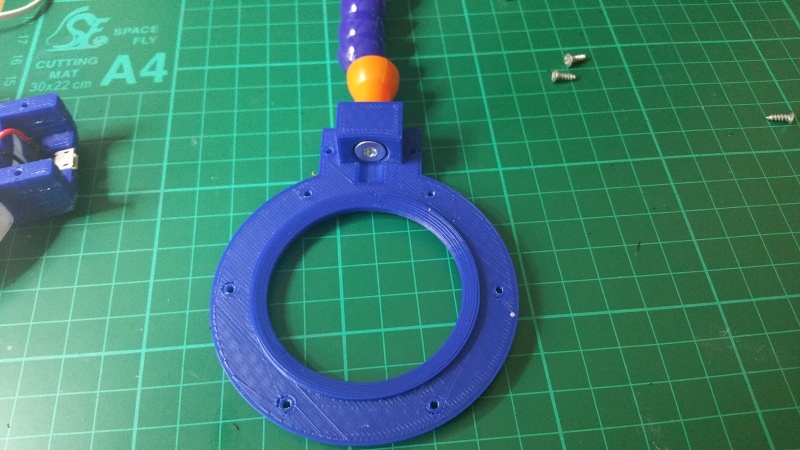
With the lid secured to the arm, it was time to screw it to the core with the 2x8mm self-tapping screws. At this point it is important to make sure that the magnifying glass is already placed on the core, otherwise this will be a futile effort. The end result should look as follows:

The final and probably the most exciting step of the process is to connect the arm back to the pana-hand and connect the μUSB cable. If you used similar materials you should get a pretty decent light diffusion all the way to the centre of magnifying glass. In my case, you can see that the light towards the centre is quite uniform:

If you used Taulman T-Glase but didn’t manage to get such a uniform light diffusion, you can try printing the part again increasing the nozzle size and reducing the temperature. According to Taulman, this will produce a clearer print with improved optical properties. In any case, I believe that white PLA with a hollow diffuser would have been good enough with sufficiently bright LEDs, so if you try it out yourself, let me know!
Conclusion
Overall I’m pretty happy with the build, sometimes these types of projects end up producing something interesting but with little or no practical use, and probably the same can be said of most of the things I’ve ever 3D printed, but this is definitely one I will make use of. It has also been interesting printing multiple materials as that was the main goal I had in mind when I decided to build a printer with a dual extruder.
Unfortunately printing with multiple materials presents some challenges which need to be overcome by either making a “dual colour friendly” design or making a large number of calibration prints to get the parameters exactly right. In my opinion Simplify3D is probably one of the best slicers out there, but I believe it still needs some work in order to support this type of prints. I could probably come up with a number of additions which would have helped, but the most important one I think would be the ability to print a brim on either the ooze shield or the prime pillar using the extruder assigned to each specific feature.
If you’re interested in making your own magnifying arm, you can download the and print them yourself. If you don’t have a dual extruder or you don’t want to go through the same process I did, you can always print each part individually and then glue the c0re and diffuser parts together, the result should be more or less the same.

Please be aware that this work is licensed under a Creative Commons Attribution-NonCommercial-ShareAlike 4.0 International License. This includes not only this blog post but also the STL files which I have produced after many hours of work. If you would like to use my work for commercial purposes, please get in contact with me.
That’s all folks!
Posted In:
- 3D Printing
- DIY
- Electronics
- Projects
Tagged:
- 3D Printing
- Electronics
- Soldering
Perhaps others have mentioned this, but I didn’t see any comments.
You *cannot* use a single current-limiting resistor for multiple LEDs in parallel like that. Due to slight differences in the LEDs, one may take more current than the other, and can get destroyed (or at least will be non-uniform brightness). Instead, you can run LEDs in series; each provides a voltage drop and when the sum of the voltage drops matches your supply, you don’t need a current limiting resistor at all; the LED chain provides its own. That’s how LED stoplights work, and why when one LED burns out there will be a whole line or patch of dark LEDs.
Dithermaster you are right about only using 1 resister being a bad idea, however the ideal solution is to use a current limiter with each led. Problem with running in series is, if you have 10 LEDs with voltage drop of 2.8V like he is using, then the source voltage would have to be 28v. This would not be as convenient to implement as powering from a USB cable.